Create a Registration and Login System with PHP and MySQL
How to create a Registration and Login System with PHP and MySQL. Here is the quick solution to build a login system with PHP and MySQL. Nowadays almost every website provides Registration and login functionality. Thus, it is necessary to add a login system in modern web applications.
In this tutorial, we walk through the complete process of creating a user registration system. Users can create an account by providing username, password, email. After the account was created, the user can log in to their own account. Once the user login, it will redirect to the Dashboard page. Moreover, the user can logout from his panel. This whole system we are developed using PHP and MySQL.
Furthermore, we will show you how to build secure pages that are only accessed by logged in users. Without login, the user can not access the page.
How to create a Registration and Login System with PHP and MySQL
Here are Seven pretty simple steps you have to follow to create a login system.
- Create a Database and Database Table
- Connect to the Database
- Session Create for Logged in User
- Create a Registration and Login Form
- Make a Dashboard Page
- Create a Logout (Destroy session)
- CSS File Create
Create a Database and Database Table
First, you have to log in to PHPMyAdmin. Next, click on the Database tab to create a new database. Enter your database name and click on create database button. As soon as PHPMyAdmin will create a new database.
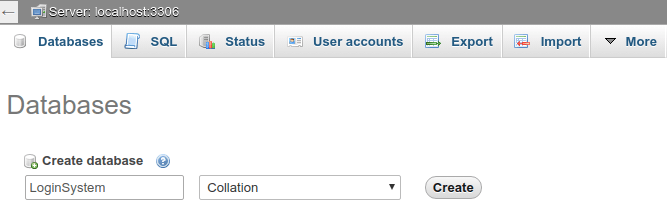
Similarly, you can execute the below query to create a database.
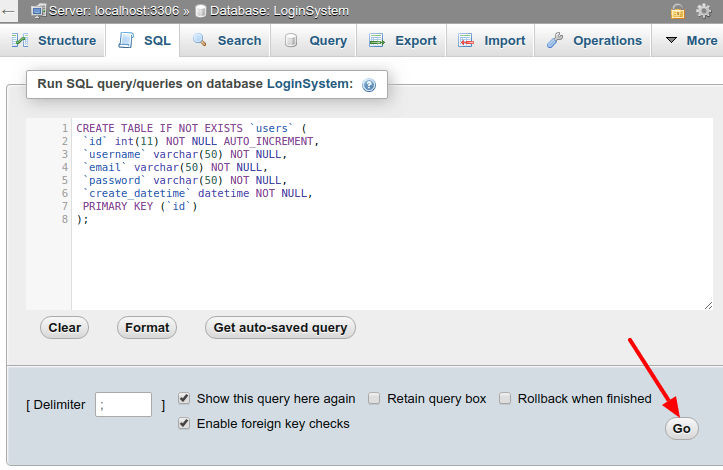
CREATE DATABASE LoginSystem;Once you create a database, the second step to creating a user table. The user’s table will have the following fields.
- id – int(11)
- username – varchar(100)
- email – varchar(100)
- password – varchar(100)
- create_datetime – datetime
CREATE TABLE IF NOT EXISTS `users` (
 `id` int(11) NOT NULL AUTO_INCREMENT,
 `username` varchar(50) NOT NULL,
 `email` varchar(50) NOT NULL,
 `password` varchar(50) NOT NULL,
 `create_datetime` datetime NOT NULL,
 PRIMARY KEY (`id`)
);
Copy the above query and execute it in the SQL query area.
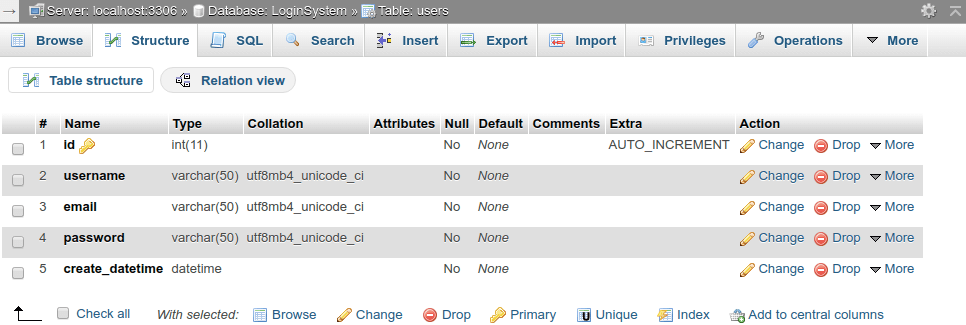
Your database table looks like the below screen.
Connect to the Database
After creating the table, we have to create a PHP MySQL connector script to connect to the MySQL database server. Create a file named db.php and put the following code inside it.
db.php
<?php
    // Enter your host name, database username, password, and database name.
    // If you have not set database password on localhost then set empty.
    $con = mysqli_connect("localhost","root","root","LoginSystem");
    // Check connection
    if (mysqli_connect_errno()){
        echo "Failed to connect to MySQL: " . mysqli_connect_error();
    }
?>
Session Create for Logged in User
Next, we have to create a session for the user. Create a file named auth_session.php and paste the codes below.
auth_session.php
<?php
    session_start();
    if(!isset($_SESSION["username"])) {
        header("Location: login.php");
        exit();
    }
?>
Creating a Registration Form
Furthermore, create PHP file registration.php and paste the following example code in it. This will create an HTML form. It will allow users to register.
registration.php
<!DOCTYPE html>
<html>
<head>
<meta charset="utf-8"/>
<title>Registration</title>
<link rel="stylesheet" href="style.css"/>
</head>
<body>
<?php
require('db.php');
// When form submitted, insert values into the database.
if (isset($_REQUEST['username'])) {
// removes backslashes
$username = stripslashes($_REQUEST['username']);
//escapes special characters in a string
$username = mysqli_real_escape_string($con, $username);
$email = stripslashes($_REQUEST['email']);
$email = mysqli_real_escape_string($con, $email);
$password = stripslashes($_REQUEST['password']);
$password = mysqli_real_escape_string($con, $password);
$create_datetime = date("Y-m-d H:i:s");
$query = "INSERT into `users` (username, password, email, create_datetime)
VALUES ('$username', '" . md5($password) . "', '$email', '$create_datetime')";
$result = mysqli_query($con, $query);
if ($result) {
echo "<div class='form'>
<h3>You are registered successfully.</h3><br/>
<p class='link'>Click here to <a href='login.php'>Login</a></p>
</div>";
} else {
echo "<div class='form'>
<h3>Required fields are missing.</h3><br/>
<p class='link'>Click here to <a href='registration.php'>registration</a> again.</p>
</div>";
}
} else {
?>
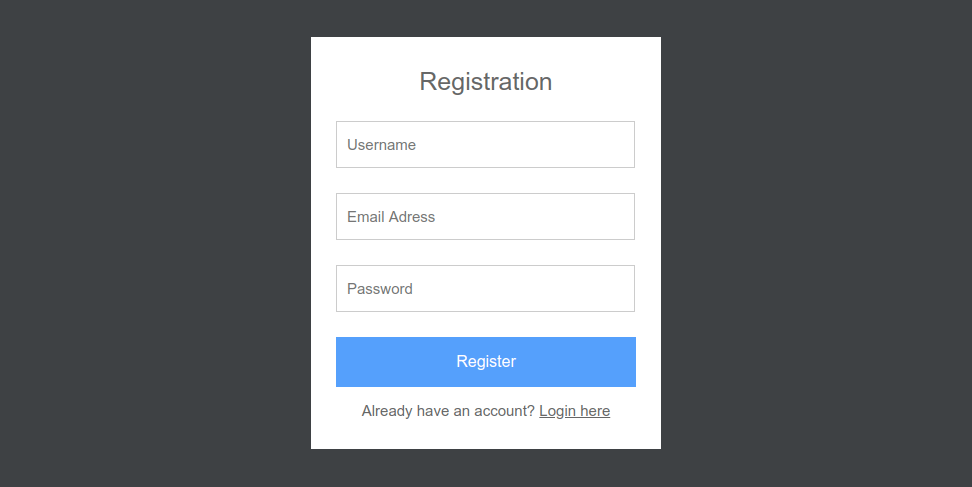
<form class="form" action="" method="post">
<h1 class="login-title">Registration</h1>
<input type="text" class="login-input" name="username" placeholder="Username" required />
<input type="text" class="login-input" name="email" placeholder="Email Adress">
<input type="password" class="login-input" name="password" placeholder="Password">
<input type="submit" name="submit" value="Register" class="login-button">
<p class="link"><a href="login.php">Click to Login</a></p>
</form>
<?php
}
?>
</body>
</html>The output of the above code will look like this.
Creating a Login Form
Similarly, create a PHP file login.php and put the following example code in it. This file code contains a form that allows users to enter username and password.
login.php
<!DOCTYPE html>
<html>
<head>
<meta charset="utf-8"/>
<title>Login</title>
<link rel="stylesheet" href="style.css"/>
</head>
<body>
<?php
require('db.php');
session_start();
// When form submitted, check and create user session.
if (isset($_POST['username'])) {
$username = stripslashes($_REQUEST['username']); // removes backslashes
$username = mysqli_real_escape_string($con, $username);
$password = stripslashes($_REQUEST['password']);
$password = mysqli_real_escape_string($con, $password);
// Check user is exist in the database
$query = "SELECT * FROM `users` WHERE username='$username'
AND password='" . md5($password) . "'";
$result = mysqli_query($con, $query) or die(mysql_error());
$rows = mysqli_num_rows($result);
if ($rows == 1) {
$_SESSION['username'] = $username;
// Redirect to user dashboard page
header("Location: dashboard.php");
} else {
echo "<div class='form'>
<h3>Incorrect Username/password.</h3><br/>
<p class='link'>Click here to <a href='login.php'>Login</a> again.</p>
</div>";
}
} else {
?>
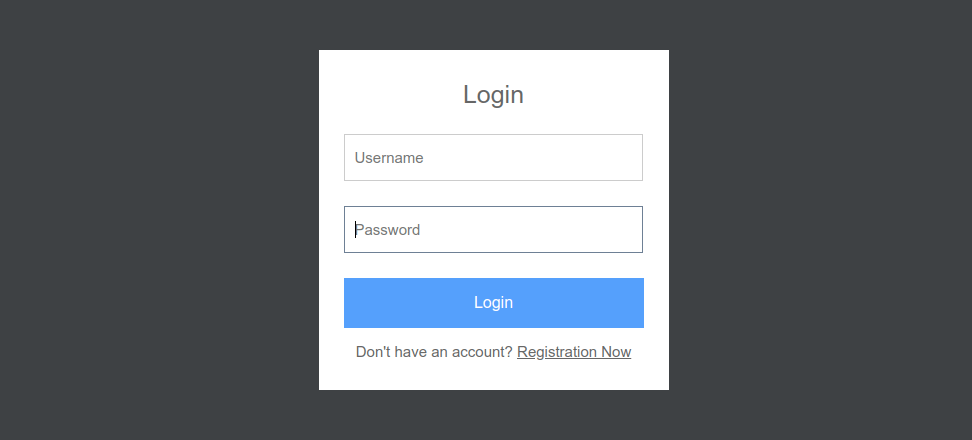
<form class="form" method="post" name="login">
<h1 class="login-title">Login</h1>
<input type="text" class="login-input" name="username" placeholder="Username" autofocus="true"/>
<input type="password" class="login-input" name="password" placeholder="Password"/>
<input type="submit" value="Login" name="submit" class="login-button"/>
<p class="link"><a href="registration.php">New Registration</a></p>
</form>
<?php
}
?>
</body>
</html>Similarly, the output of the above code will look like this.
Making a Dashboard Page
Once user login we will redirect to the user dashboard page. Create a PHP file named dashboard.php and paste the below code in it.
dashboard.php
<?php
//include auth_session.php file on all user panel pages
include("auth_session.php");
?>
<!DOCTYPE html>
<html>
<head>
    <meta charset="utf-8">
    <title>Dashboard - Client area</title>
    <link rel="stylesheet" href="style.css" />
</head>
<body>
    <div class="form">
        <p>Hey, <?php echo $_SESSION['username']; ?>!</p>
        <p>You are now user dashboard page.</p>
        <p><a href="logout.php">Logout</a></p>
    </div>
</body>
</html>
After the user login, you will see the following user dashboard screen.

Similarly, you can create another secure page. Only you need to add the below code first in your PHP file.
<?php
require('db.php');
include("auth_session.php");
?>
Create a Logout (Destroy session)
When clicking on the logout button we have to destroy user sessions. It will redirect to the login page. Thus, create a file named logout.php and add the below code.
logout.php
<?php
    session_start();
    // Destroy session
    if(session_destroy()) {
        // Redirecting To Home Page
        header("Location: login.php");
    }
?>
CSS File Create
Finally, important step for a user experience perspective. Create CSS file style.css and put the below code.
style.php
body {
    background: #3e4144;
}
.form {
    margin: 50px auto;
    width: 300px;
    padding: 30px 25px;
    background: white;
}
h1.login-title {
    color: #666;
    margin: 0px auto 25px;
    font-size: 25px;
    font-weight: 300;
    text-align: center;
}
.login-input {
    font-size: 15px;
    border: 1px solid #ccc;
    padding: 10px;
    margin-bottom: 25px;
    height: 25px;
    width: calc(100% - 23px);
}
.login-input:focus {
    border-color:#6e8095;
    outline: none;
}
.login-button {
    color: #fff;
    background: #55a1ff;
    border: 0;
    outline: 0;
    width: 100%;
    height: 50px;
    font-size: 16px;
    text-align: center;
    cursor: pointer;
}
.link {
    color: #666;
    font-size: 15px;
    text-align: center;
    margin-bottom: 0px;
}
.link a {
    color: #666;
}
h3 {
    font-weight: normal;
    text-align: center;
}
Finally, our login system is ready to use. You can download the source code from the below download link.
Final Thoughts
That all you need to know how to create registration and login system in PHP with MySQL database. Furthermore, we create a registration and login form. Moreover, we create a MySQL connection file to establish a database connection. Thus we create a complete login system with interactive design.
We hope you have found this article helpful. Let us know your questions or feedback if any through the comment section in below. You can subscribe our newsletter and get notified when we publish new WordPress articles for free. Moreover, you can explore here other JavaScript related articles.
Icon made by Kmg Design
If you like our article, please consider buying a coffee for us.
Thanks for your support!
 Buy me a coffee!
I get an error message “Required fields are missing.”
Make sure you entered your username, email and password in the registration form.
I did several times but the program still comes back with that message.
hi
check ur table in database , set unused rows in database ( Null )
oh, awesome thank you
perfectly working. Thank you
Thank you sir.
this is because of php7 version
How do I solve this PHP-issue
Hi,
i get the following warning.
But nothing happen after Login?
Warning: session_start(): Cannot start session when headers already sent in /Library/WebServer/Documents/Login/login.php on line 11
Warning: Cannot modify header information – headers already sent by (output started at /Library/WebServer/Documents/Login/login.php:1) in /Library/WebServer/Documents/Login/login.php on line 26
What’s wrong here..cant get the dashboard.php
Best regards,
Mergim Alija
English Solution:
The problem is in the session_start ()
It should be first on your login.php page. Try it and you will see that it works!
………………………….
Solución en Español:
El problema está en el session_start ()
Debe ser lo primero en tu página login.php. Pruébalo y verás que funciona!
Thank you sir, I’m very fortunate to feel you make things work. it really work well for me, I appreciate
Hi
Thanks for the tutorial on the login and user registration. Very much appreciated, so simple and easy to follow for a newbie like myself who is just starting out really in PHP.
Thank you for the tutorials it really useful for me to create a blog….
Thanks a lot for this post. I’ve searched all over the internet for perfect login system finally found yours:)
thanks for your tutorial it was useful for me to understand how it works, but I have a problem with your code, after registering and proceeding with the login on click instead of proceeding to the dashboard.php page redirects me to login.php
Hi
Its Strange, We checked after login redirect to dashboard page. So what is wrong you found in our code?
Your style is very unique compared to other folks I’ve read stuff from.
Thanks for posting when you have the opportunity, Guess I will just bookmark this
blog.
what about date colomun?
Required fields are missing. getting error
Warning: mysqli_query() expects parameter 1 to be mysqli, boolean given in C:\xampp\htdocs\registerform\registration.php on line 24
its working fine, also how to route non logged in users to login page if they directly access dashboard page . Thank you guys….
It works and we’ll explained thanks very much
hello ! will it work in wordpress ? I have a theme { and it is a woocommerce theme }, but its login system is very poor , so I want to add this login system by replace those code ? Will it work for me or easy to me set these codes? If anyone know please reply
Has your code working perfectly with php5 (thank you!), but now having issues with this solution with shift to php7. Is there anything in the code that needs changing to make it work with php7?
For new users, it would be nice to have a link to a complete list of prerequisites, otherwise very nice tutorial
Great tutorial! Works like a charm! Thank you 🙂
I changed the form to take first name and last name in the registration.
i removed the password from “db.php” now it looks like this
$con = mysqli_connect("localhost", "root", "", "LoginSystem");It is running perfectly fine. Thank you so much for the code
This worked for me as well, thank you sir!
How to make the dashboard display user full details?
thank you for thisss
Thank you for this ………..
thank you
awesome, i tried, its working fine!
Its working ..greate,..
I’m pretty new at this. How do I call the PHP in to execute the “login/register” system in my website?
Thank you
Hello.
Thank you for the awesome work.
Nice Work! I like that 🙂
Great explanation with respective screenshots like it very much thanks
omggg it works thanks a lottt
Nice tutorial, works well! One thing I noticed. It says style.php when it should say style.css.
Perfect 💯% I appreciate it
Really useful article! I followed the steps and it really works! Thanks my friend!
Perfect thankyou
Thanks lot Perfect Working