How to Embed a Video in WordPress Blog Posts? [The Ultimate Guide]
Videos can hook the audience instantly, and featuring videos can be a great way for your website to reach more people. In fact, studies found that 54% of consumers prefer seeing more and more video content from a business or website they support. This is why we have come up with the ultimate guide to how to embed a video in WordPress blog posts.
According to the Video Marketing Statistics, “88% of people say that they’ve been convinced to buy a product or service by watching a brand’s video.” With the increasing craze for video content, now almost 86% of marketing professionals are using video content as their marketing tool.
Still, to make the most out of your video content, you need to use them in a proper way; otherwise, it will affect the performance of your website and lead the site to a bad user experience.
How to Embed a Video in WordPress Blog Posts?
You can embed video on your site in two different ways, such as using WordPress’s built-in feature and a plugin. We will share both methods in the ultimate guide to using video with WordPress.
How to Embed Video in WordPress Without Plugin?
Embedding video to your website using the WordPress default functions is just a matter of a few clicks. All you need to do is:
Method 1
- Login to your WordPress admin panel.
- Then, select the post or page menu, and from there, you can open your existing posts, or if you want, you can click the “Add New” button.
- Next, choose the “Visual tab” of your WordPress editor.
- Now, simply copy the actual URL of the video you wanted to use on your site, and paste it directly into the visual tab. And then, WordPress will automatically convert the YouTube link into an embed.
It’s the easiest way of embedding videos into your WordPress website. But, while following this method, you just need to make sure that you are pasting the URL into the visual tab; it won’t work if you paste the URL into the Text tab.
Method 2
In WordPress, there is another way of embedding video. To use this method, follow the steps below.
- Open a new post or page, or you can go to any of your existing posts.
- From there, select the “Add Media” button located under the title.
- Then choose the “Insert from URL” option.
- Paste your video URL into the URL box and hit the “Insert into Post” button from the below right-side corner.
Method 3
If you want to add more than one video, you can create a playlist and then add all the videos. So, let’s find out how to do it-
- Select the “Add Media” button from your page or post,
- From the left side pop-ups, select the “Create Video Playlist“
- Now, you can add videos by uploading the files or directly through your media library.
- Now, once you are done with the video selection, start adding the title, caption, and description by selecting each video one by one.
- Once done, select the “Create a new video playlist” button from the bottom.
- Now, you can customize the videos from the right-sidebar settings options.
- When you are done with all these changes, select the “Insert video playlist” button and finally, update or publish the post.
Note: You can also add video from the “Media Menu“.
How to Embed Video in WordPress Using Plugin?
If you’re using a lot of videos on your website, you must focus on providing a better viewing experience. In this case, the basic WordPress video embedding functionalities won’t work.
You need to use the wordpress video gallery plugin to gain more control over the videos on your website, use more advanced customization options, and make them more user-friendly. Here are some best plugins which you will find really useful to add your videos and customize them.
- WordPress YouTube Video Gallery
- Embed Plus for YouTube
- WP Video LightBox
- All-In-One Video Gallery
- Gallery Blocks With LightBox
So, let’s see how to use the plugin to add YouTube videos to your WordPress site. In this guide, we will use the WordPress YouTube Video Gallery plugin which is one of the best plugins plus it is really easy to use.
Step 1: Install the WordPress YouTube Video Gallery Plugin
As we all know, to use a plugin first, you need to install and activate it, so, from the WordPress dashboard, install this WordPress YouTube Video Gallery plugin.
Step 2: Add Video Gallery with Thumbnails to WordPress Page
After you activate this plugin, you will get a new menu on your dashboard called “YouTube Gallery“.

- Now, select the “YouTube Gallery” menu and choose “Add New”. After that, you can change the settings as your requirement from the general, controls, and typography sections, and then click the Publish button.
- Once you hit the publish button, you will immediately get a shortcode.

- Now, all you need to do is copy the shortcode, go to Pages ⇒ Add New, and then add a title to your post.

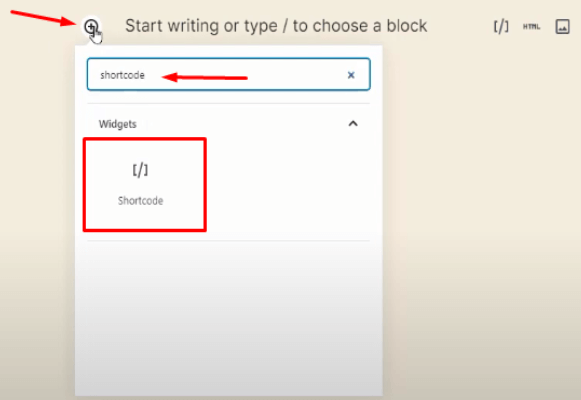
- Then you will see a (+) button just below the title. Click on this (+) button and search with the shortcode. When the shortcode block appears, simply click on it.
- Now, paste the shortcode into the box.
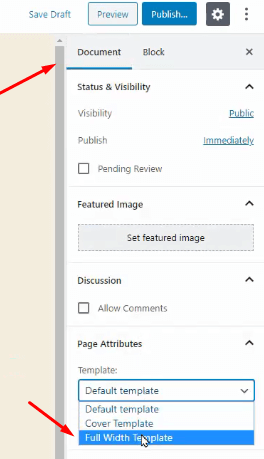
- Next, make some customization using the “Document” section from the right side corner of the same page.
- From this bar, you can change the status and visibility, featured image, discussions, if you want.
- Finally, you need to change the page attribute to full width template and then hit the “Publish” button.

Step 3: Add the API Key
Then, move forward to adding the API key. To do so, you need to follow the following steps.

- Navigate to “YouTube Gallery” ⇒ Settings ⇒ How to get API key ⇒ Google API Console.
- When you select the Google API console, you will be redirected to a new page, and also a prompt will pop up. Simply select the country, put a tick mark on the terms of services and email updates options, and click on Agree and Continue button.

- Then, the API & Service page will appear; from this page, choose Credential ⇒ Create Project.
- Next, put the project name, and select the Create button.

- Once done, choose the “+ create credentials” button and thenselect the API Key from the dropdown menu.

- Now, copy the API key.
- Again, navigate to the “YouTube Gallery Settings” page and paste your API key.

- Finally, by clicking the Save button, you can save all your changes and view the video.
Step 4: Single Video Adding
So, if you want to add single videos to your WordPress site, using this plugin you can do this really quick.

- From your WordPress dashboard, scroll down to the “YouTube Gallery” menu.
- Select “Add New”.
- Now, from the plugin dashboard, first, give a title to your post.
- Copy your video ID and paste the ID into the video ID box.
- If you want, you can change the display mode.
- Next, publish the post, and once done you will get a shortcode.
- Copy the shortcode and paste the code below the first video.
- Finally, click on the update button, and it’s done.
How to Embed Video in WordPress Sidebar Widgets?
- Navigate to Appearance ⇒ Widgets.
- Now, head over to the video widget, add title, copy the video URL and paste it. Also, you can select files by clicking on the Add Video button.
- Finally, save the changes.
How to Embed Vimeo Video in WordPress?
Embedding Vimeo videos in WordPress is as simple as embedding YouTube videos. All you need to do is copy the URL of the video and paste it into the visual tab of your WordPress editor. And then update or publish the post.
Wrap Up
Videos can be really powerful for your website to enhance your website’s users’ experience. With featured videos, you can ensure delivering a lot more information to your users and make them engaged with your site for a longer duration.
Though you can embed videos by simply copying and pasting the URL, the best way is to add videos using third-party plugins. With this, you can have more creative video galleries requiring minimal space. To help you in this, we have shared the ultimate guide to using video with WordPress.
We hope you have enjoyed this guide and get what you are looking for.
We hope you have found this article helpful. Let us know your questions or feedback if any through the comment section in below. You can subscribe our newsletter and get notified when we publish new articles for free. Moreover, you can explore here other interested articles.
Icon made by Designed by storyset – Freepik
If you like our article, please consider buying a coffee for us.
Thanks for your support!
 Buy me a coffee!

![How to Embed a Video in WordPress Blog Posts? [The Ultimate Guide]](https://speedysense.com/wp-content/uploads/2022/04/embed-video-in-wordpress.png)
Thank you for sharing the awesome article with us. that’s very useful. Provides much-needed knowledge.