How to Install Shotcut Video Editor in Ubuntu 18.04, 18.10
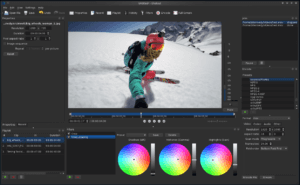
The Shotcut video editor software has recently release 19.06 version. Here quickly tip for how to install Shotcut video editor in Ubuntu 18.04 and Ubuntu 18.10. Furthermore, Shotcut is a free, open-source, cross-platform video editor. It is available on Linux, Windows, and Mac OS. Even more, it supports a wide range of formats. Thus, this is the major features of Shotcut.
Video editing is not easy, but Shotcut is a user-friendly and straightforward editor that gives us lot’s of functions and features to edit videos. Here are some significant features of Shotcut.
Shotcut Features
- Support a wide range of format
- Audio features such as audio filters, audio mixing, tone generator etc.
- Video Effects such as support HTML5, auto-rotate, speed effect etc.
- Editing Features
- Display and Monitoring
- Cross-Platform & Codec Independent
Install Shotcut Video Editor in Ubuntu
Here is a Shotcut non-install Linux binary package available for download on Github.
There are two ways to install Shotcut on Linux. One is using PPA repository and other is Snap Store. We’ll see both way.
Install Prerequisites
Most important first, we need to install a libsdl2 library that is needed to run Shotcut. Run the following command
sudo apt install libsdl2-dev
Install Shotcut Video Editor using PPA repository
If anyone wants to install Shotcut with application shortcut, you may use this unofficial PPA repository and follow below step.
Step 1 Add PPA Repository
Open terminal or use keyboard shortcut CTRL+ALT+T. Run below command to add the PPA.
sudo add-apt-repository ppa:haraldhv/shotcut
Step 2 Update/upgrade apt list and packages
Next, update apt list of available package and their versions. Also, use upgrade command to installs newer versions of the packages.
sudo apt-get update && sudo apt-get upgrade
Step 3 Install Shortcut
Finally, you have to run following command to install Shortcut.
sudo apt install shotcut
Once installation completed, launch it from your application launcher.
Install Shotcut Video Editor using Snap Store
Step 1 Install Snapd
If you are using the latest Ubuntu 18.04 LTS (Bionic Beaver), you do not need to install it. Because SNAP has already installed. However, if snap doesn’t have, you can use the below command to install a SNAP.
sudo apt-get install snapd
Step 2 Install Shotcut using SNAP
Next, run following command to install Shotcut video editor using SNAP.
sudo snap install shotcut --classic
Step 3 Launch Shtocut video editor
After installation completed. Finally, go to application and search “Shotcut” to launch it.
Uninstall Shotcut Video Editor
To uninstall the Shotcut, simple you have to run the below command in terminal.
sudo apt remove shotcut && sudo apt autoremove
After remove, Go to System Settings » Software & Updates » Other Software tab to remove PPA repository.
We hope you have found this article helpful. Let us know your questions or feedback if any through the comment section is below. You should subscribe to our newsletter and get notified when we publish new articles. Even more, you can explore here other interesting articles.
If you like our article, please consider buying a coffee for us.
Thanks for your support!
 Buy me a coffee!
Join the Discussion.